Process to Upgrading vSphere
Upgrading vSphere has two parts
TABLE OF CONTENTS
1)Upgrade VCenter Server Appliance (VCSA)
2)Upgrade ESXi Servers
- Upgrading the Vcentre Server
Pre-Upgrading VCSA
Before upgrading my VCSA, I checked the release notes for any issues that may cause problems within my environment, and then checked the VMware Product Interoperability Matrix to make sure that it would work with other products in my environment.
Because there's a specific sequence by which to upgrade vSphere 6.7, and it's possible this order will change in the future, you should check the latest documentation for the latest guidance and caveats before proceeding. As of now, however, the basic procedure is as follows: upgrade the Platform Service Controller (PSC) first, then the vCenter Server and last the ESXi hosts. VMware has a Knowledge Base entry on the update sequence for vSphere 6.7 and its compatible VMware products.
In my case, I'll only be upgrading the VCSA as my ESXi hosts run on Intel processors that aren't supported in vSphere 6.7. If you're planning on upgrading your ESXi hosts, check the VMware hardware compatibility list (HCL) to verify that your equipment is supported. Figure 1 is a matrix that outlines the versions of ESXi that are supported with vSphere 6.7 VCSA.
Upgrading VCSA
There are a few different ways to upgrade your VCSA, and in my case the easiest way was to download the VCSA ISO image and do the upgrade from it.
To download the VCSA ISO image I went to my.vmware.com, proceeded to the Products page (Figure 2), selected vSphere, and then selected the VMware vCenter Sever Appliance to download (Figure 3). There was also a VMware vCenter Sever Appliance Update Bundle, but this is to update VCSA 6.7 to the latest patch bundle; this is not what you want to download if you're upgrading from a previous VCSA version.

Downloading VCSA 6.7
.
Figure 3. VCSA 6.7 version and build.
After the ISO had downloaded and I had backed up my VCSA appliance, I mounted the ISO on my desktop system, navigated to the mountpoint F:/VMware VCSA/ccsa-ui-installer/win32 and double-clicked the installer.exe file

Figure 4. The VCSA installation package.
The installer UI displays four different options (Install, Upgrade, Migrate and Restore) as shown in Figure 5, and I selected Upgrade. Upgrading is a two-stage process: The first stage deploys a new appliance to the target vCenter server or ESXi host; the second stage copies the data from the source appliance to the deployed appliance.

Figure 5. The four different VCSA options.
I worked my way through the Upgrade wizard, accepting the end-user license (EUL) agreement, and inputting the IP address and login credentials for my existing VCSA and the ESXi host on which it was running, the ESXi host I wanted to deploy the VCSA, the name of the VCSA, and the root password I wanted it to have (Figure 6).

Figure 6. Upgrading the VCSA using the Upgrade wizard.
I was then asked for the size of VCSA I wanted to deploy (Figure 7).

Figure 7. Deployment size.
Next, I was asked what datastore and networking configuration I wanted to use. The last step in the wizard was to verify the information and then click Finish.

Figure 8. Stage 1 finish.
A screen was then displayed indicating that the deployment had been kicked off (Figure 9).

Figure 9. VCSA deployment started.
After a few minutes I was notified that Stage 1 had completed (Figure 10), and after I clicked Continue and Next, the Stage 2 automatically started (Figure 11).
Figure 10. Stage 1 completed
.
Figure 11. Starting deployment with Stage 2.
During the installation, I was asked what historical data I wanted to import from the existing VCSA (Figure 12).

Figure 12. Importing historical data.
The last step in the wizard was to verify the information I had entered and that the existing VCSA had been backed up (Figure 13).

Figure 13. Ready to complete Stage 2.
After about 30 minutes, a screen appeared saying that Stage 2 had completed; the page also included an Appliance Getting Started Page link (Figure 14).
ESXi Upgrade Requirements
The hardware of a server running ESXi 6.7 must be compatible with ESXi 7.0, that is, it must meet the hardware requirements for ESXi 7.0. If an unsupported device is present (for example, an old unsupported CPU or disk controller), the ESXi upgrade will not be applied to the server. See VMware Hardware Compatibility Guide.
There must be no running VMs on an ESXi host when you start the ESXi upgrade process. There must also be enough free storage space for the ESXi upgrade.
If an ESXi host is managed by vCenter Server, the vCenter version must be the same or higher compared to the target version of ESXi after upgrade. VMware vCenter 7.0 can manage ESXi 7.0, ESXi 6.7 and ESXi 6.5, but vCenter 6.7 cannot manage ESXi 7.0 hosts. Thus, you have to upgrade vCenter first and then go to ESXi upgrade if you want to upgrade vSphere 6.7 to 7.0. Follow this vSphere upgrade order, otherwise you can lose the connection between an ESXi host and vCenter.
If there are any VMware add-ons or plugins installed, check their compatibility by using the VMware Compatibility Matrix.
ESXi Upgrade Methods
This blog post covers two main methods for a VMware ESXi upgrade:
- Upgrade by using ESXCLI, the command line interface. This method can be used for VMware ESXi 6.7 to 7.0 upgrade for standalone ESXi hosts and ESXi hosts managed by vCenter.
- Upgrade by using Lifecycle Manager. This method is applicable only for ESXi hosts managed by vCenter Server. VMware Lifecycle Manager for VMware vSphere 7.0 is a modified VMware Update Manager that was used in vSphere 6.7. This is the preferred method for upgrading ESXi hosts managed by vCenter and allows you to upgrade multiple ESXi hosts at once by using the same image.
How long does ESXi upgrade take? An ESXi upgrade takes a few minutes if there are no compatibility issues or other problems.
ESXi Upgrade by Using ESXCLI
Although ESXi upgrade by using ESXCLI is not difficult, you should still perform an ESXi backup before upgrading. This way, if anything goes wrong, you can roll back to a backup version. Read also how to back up ESXi configuration.
Enable ESXi Shell and SSH to access the command line interface on the ESXi host. You can do this by using one of two methods:
- In the ESXi direct console (DCUI), open System customization and in Troubleshooting options, hit Enable ESXi Shell and Enable SSH. This configuration enables SSH and ESXi Shell permanently until you manually disable them.
- Enter the IP address of your ESXi host in a web browser. Log into the VMware Host Client by using your ESXi root credentials. In the web interface of the VMware Host Client go to Manage > Services.
Start the services:
These services will be enabled until ESXi reboot if you started the services in VMware Host Client.

Check the current version of ESXi in the ESXi Direct Console or ESXi Shell by using the vmware -v command or in VMware Host Client by going to Help > About.

Shut down all VMs running on the ESXi host.
ESXi upgrade by using ESXCLI is divided into two types:
The offline method for ESXi upgrade
Download the ESXi 7 offline bundle from the VMware website. The zip archive of the offline bundle is available along with the ESXi ISO installation image. In our case the name of the downloaded VMware vSphere Hypervisor (ESXi) offline bundle file is:
VMware-ESXi-7.0.0-15843807-depot.zip

Upload the downloaded zip file to the ESXi datastore. You can use VMware Host Client or any SFTP client (if you want to upload a file via SSH). Let’s use VMware Host Client to upload the file.
Go to Storage > Datastores, select the datastore (datastore1 in our case), and click Datastore Browser.
Select a directory to store bundle files or create a new directory in the datastore browser. We create the ESXi7-bundle directory to store the VMware-ESXi-7.0.0-15843807-depot.zip file. Click Upload to browse a zip bundle file and upload the file to the selected directory in the datastore.
Make sure that there are not any VMs in the running state on this ESXi host before starting the ESXi upgrade process.
vmware -v is the command that allows you to check the current version of ESXi running on your server in the console.
Run the update command to upgrade ESXi 6.7 to 7.0:
esxcli software profile update -p ESXi-7.0.0-15843807-standard -d /vmfs/volumes/datastore1/ESXi7-bundle/VMware-ESXi-7.0.0-15843807-depot.zip
where ESXi-7.0.0-15843807-standard is the ESXi profile name that contains the version and build number that is equal to the ESXi version and build number defined in the name of the VMware-ESXi-7.0.0-15843807-depot.zip file used for ESXi upgrade. A profile consists of VIBs and defines an ESXi image. A VIB is an ESXi software package.
Wait for a while until you see the command output.

After successful execution of the command you can see a list of updated packages (VIBs – VMware installation bundles) in the console output.

Reboot the ESXi host to finish the ESXi upgrade:
reboot
Don’t forget to assign a serial number for ESXi 7.0 because the serial number for ESXi 6.7 doesn’t work for ESXi 7.0. Since the vSphere 6 license is not valid, the upgraded ESXi 7.0 host starts to work in the full-featured evaluation mode for a 60-day period. Thus, you have 60 days after upgrade to enter a vSphere 7 serial number otherwise the functionality of ESXi 7.0 will be limited.
The online method for ESXi upgrade
When using the online method, you should configure internet access for the ESXi host that you want to upgrade and place the host in maintenance mode manually.
List the current image profile and contained packages:
esxcli software profile get

Enter ESXi to the maintenance mode:
vim-cmd /hostsvc/maintenance_mode_enter
or
esxcli system maintenanceMode set --enable true
Allow http traffic by editing settings in the built-in firewall on the ESXi host:
esxcli network firewall ruleset set -e true -r httpClient
List profiles provided by VMware for ESXi 7.0 in VMware repositories:
esxcli software sources profile list -d https://hostupdate.vmware.com/software/VUM/PRODUCTION/main/vmw-depot-index.xml | grep ESXi-7.0.0
A software depot is a collection of VIBs and image profiles that has a hierarchy of files and directories that can be accessed via HTTPS. Companies who have large VMware vSphere environments can create own depots and use vSphere auto deploy to install updates on numerous ESXi hosts.
Let’s use this profile:
ESXi-7.0.0-15843807-standard
You can check which packages will be installed before running the ESXi upgrade command:
esxcli software profile update -d https://hostupdate.vmware.com/software/VUM/PRODUCTION/main/vmw-depot-index.xml -p ESXi-7.0.0-15843807-standard --dry-run
Run the update process:
esxcli software profile update -d https://hostupdate.vmware.com/software/VUM/PRODUCTION/main/vmw-depot-index.xml -p ESXi-7.0.0-15843807-standard

Wait for a few minutes until the upgrade process is finished.
Prefer using esxcli software profile update rather than esxcli software profile install to prevent overwriting existing packages, drivers, and configuration.
If you see the error message
Got no data from process: LANG=en_US.UTF-8 /usr/lib/vmware/esxcli-software profile.update -d "https://hostupdate.vmware.com/software/VUM/PRODUCTION/main/vmw-depot-index.xml" -p "ESXi-7.0.0-15843807-standard",
check whether there is a persistent scratch partition. A persistent scratch partition may be absent if you run ESXi from a USB flash drive. Read the blog post about running ESXi from the USB flash drive to learn more about ESXi partitions.
If everything is correct, reboot the ESXi host for the changes to take effect.
reboot
Exit the maintenance mode with the command:
vim-cmd /hostsvc/maintenance_mode_enter
or
esxcli system maintenanceMode set --enable false
ESXi Host Upgrade in vCenter
Open VMware vSphere Client in your web browser to access vCenter.
There are two ESXi 6.7 hosts in this example and these hosts are managed by vCenter. Shut down virtual machines on ESXi hosts that must be upgraded or migrate those VMs to other ESXi hosts. You can practice upgrading ESXi hosts in virtual environment by running ESXi hosts and vCenter as virtual machines.
Let’s upgrade the ESXi host with IP address is 192.168.11.27. Select the needed ESXi host and check the current hypervisor version. As you can see on the screenshot below, the current version of our ESXi host before upgrade is 6.7.0 build 10302608. If you want to upgrade multiple ESXi hosts, you can select a cluster or a datacenter.

Open Lifecycle Manager. You can do it by using multiple methods.
- Click Home and in the left pane (navigation pane) click Lifecycle Manager.
- Click Menu in the top of the vSphere Client window, and hit Lifecycle Manager.
Once you have opened VMware Lifecycle Manager in vSphere Client, select the Imported ISOs tab and click Import ISO.
Hit Browse and select the ESXi 7 installation ISO image file. You can download the ESXi installation image from the VMware website after registration (a VMware account is required).

Once you have selected the ISO file, the importing process starts. In this example, we use the VMware-VMvisor-Installer-7.0.0-15843807.x86_64.iso file.

After importing the ISO file, you can see that the ESXi 7.0 installation image in the Imported ISOs tab.
Click New baseline to create a new baseline.

Name and Description. Enter the baseline name and description, for example, ESXi7-0 and ESXi 7.0 baseline.

Select ISO. Select the ESXi 7 ISO image you have uploaded before (VMware-VMvisor-Installer-7.0.0-15843807.x86_64.iso).

Summary. Review your selections before finishing creating a baseline.

A baseline is now created.
Go back to the Hosts and clusters screen, select the ESXi host that must be updated (192.168.11.27 in our case), and in the top right corner of the interface click the Updates tab.
When a baseline is created, you have to attach that baseline to ESXi hosts you want to update. As you remember, we are going to update a single ESXi host in this walkthrough.
Hit Baselines, scroll down and find the Attached Baselines section, then click Attach and in the menu that opens, click Attach Baseline or Baseline Group.
Select the ESXi7-0 baseline you have created before and click Attach. If there are any other baselines attached, remove those baselines by selecting them and clicking Detach.

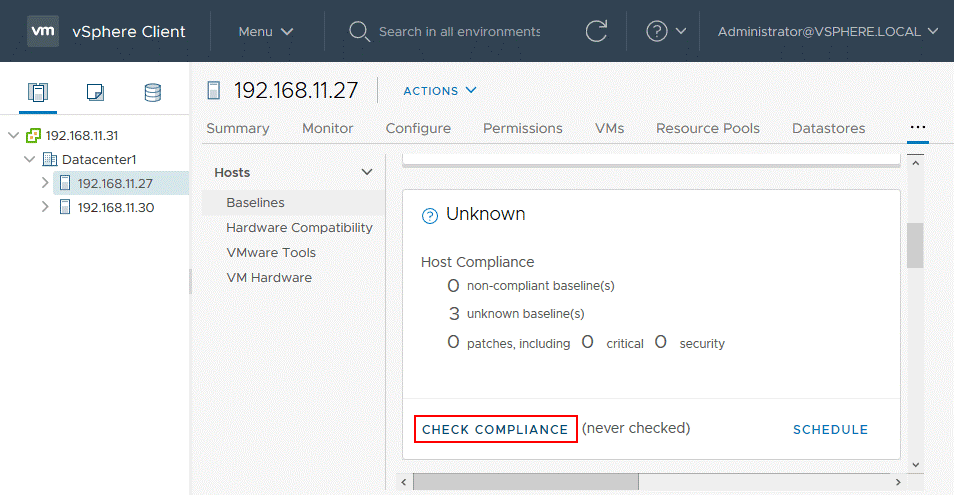
Now you have to check compliance. This step is needed to check whether the ESXi host has already the update installed. If you see the non-compliant status, it means that the update is not installed on your ESXi host. Click Check Compliance.
As you can see on the next screenshot, the ESXi status after checking is non-compliant and it means that you can install the needed update and upgrade ESXi 6.7 to ESXi 7.0.

Pre-check remediation checks for any compliance issues that may occur after installing updates and the ESXi upgrade.
As you can see on the screenshot below, there are no issues after running remediation pre-check. Hit Done and go to upgrade the ESXi host.

In the Attached Baselines section select your ESXi7-0 baseline created before and click Remediate to start the ESXi 6.7 to 7.0 upgrade process.
A pop-up screen appears. Read the End User License Agreement (EULA) and select the I accept the terms and license agreement checkbox. Hit OK to continue.

Make sure that your ESXi host is selected and hit Remediate to upgrade ESXi 6.7 to 7.0. Don’t forget that virtual machines must be powered off or migrated from the ESXi host that is being upgraded.

You can see the ESXi upgrade progress in the Recent task toolbar that can be expanded in the bottom of the VMware vSphere Client interface. The ESXi host is automatically entered into the maintenance mode to install the upgrade.
When the ESXi upgrade process is finished, the maintenance mode is turned off for the host and the upgraded ESXi host is ready to work. You can select the ESXi host in the Hosts and Clusters view and check the version after ESXi upgrade. As you can see on the screenshot below, the version of ESXi is now ESXi 7.0.0, 15843807.
If you see that a license is expired after an ESXi 6.7 to 7.0 upgrade on the upgraded host, you should apply a vSphere 7.0 license.
If you need to upgrade an ESXi host on which a vCenter VM (virtual appliance) is running you can use one of the approaches:
Note: If any of explained ESXi upgrade methods are not suitable for you, you can write the ESXi ISO installation image to a DVD disk or USB flash drive, boot from that medium, run the ESXi 7.0 installer, and select the disk where ESXi 6.7 is installed as the destination disk. The upgrade is performed in the interactive mode in this case. Another more complex ESXi upgrade method is a scripted upgrade by using a traditional boot medium like DVD and flash drive or the preboot execution environment (PXE) to run the installer. The scripted method allows you to use predefined settings for upgrading multiple ESXi hosts.